
如果你想把你的运动数据和热力图同步到 GitHub,那么你来对地方了。在这篇文章中,我将详细解释如何使用 GitHub Actions 和 Python 自动同步和更新你的数据。
这个项目是在伊洪@yihong0618的GitHubPoster的基础上进行的所以在此表示感谢。他的另一个项目是IBeat (之前我对GitHub Action做了一次尝试),从这里我开始接触了快捷指令的触发。
最终效果如下:
一. 开始前的准备
首先,你需要 fork @yihong0618的项目,并将其克隆到本地: https://github.com/whrsss/GitHubPoster
然后,安装项目的依赖项:
pip3 install -r requirements.txt
二. 全量生成历史数据
研究了一下,步骤是先全量生成历史数据(用全量模式backfill),再进行追加(incremental)。
下面是如何导出每日运动量(卡路里)出来的例子。首先,将apple 运动中的数据导出,解压在IN_FOLDER文件夹中,然后在项目根目录运行:
python3 -m github_poster apple_health --apple_health_mode backfill --year 2020-2023 --apple_health_record_type move --me "your name"
这样在OUT_FOLDER目录下就会生成一份全量的数据,IN_FOLDER下也会生成对应的全量json文件,之后的增量,会加入到IN_FOLDER的json文件中。
逻辑微调
由于我的目标是统计每日消耗的卡路里,在apple health导出的数据中,分成了两块儿, 分别是
type=”HKQuantityTypeIdentifierBasalEnergyBurned”和 type=”HKQuantityTypeIdentifierActiveEnergyBurned” ,每日基础消耗数据和每日运动活动数据。
(ps. Apple 运动记录中不同的运动类型在这里,想要自定义其他可以自取)
而在GitHubPoster中支持的3种类型中,move、exercise、stand,对应的apple health数据都是单种类型,所以,需要将type修改为数组类型才能实现。
在 github_poster/loader/apple_health_loader.py 中修改其中的 RecordMetadata 的支持和使用。
首先需要将type字段修改为一个列表或者集合。在定义RecordMetadata时,将type字段类型改为List或Set:
from typing import List

RecordMetadata = namedtuple("RecordMetadata", ["types", "unit", "track_color", "func"])
然后在定义HEALTH_RECORD_TYPES时,你就可以为每个键提供多个类型了:
HEALTH_RECORD_TYPES = {
    "stand": RecordMetadata(
        ["HKCategoryTypeIdentifierAppleStandHour", "AnotherType", ...],
        "hours",
        "#62F90B",
        lambda x: 1 if "HKCategoryValueAppleStandHourStood" else 0,
    ),
    ...
}
接着,你需要在AppleHealthLoader类的backfill方法中,修改判断记录类型的逻辑。将原来的等于比较改为检查类型是否在types列表中:
def backfill(self):
    from_export = defaultdict(int)

    in_target_section = False
    for _, elem in ET.iterparse(self.apple_health_export_file, events=["end"]):
        if elem.tag != "Record":
            continue

        if elem.attrib["type"] in self.record_metadata.types:
            ...
这样,每个RecordMetadata就可以包含多个type了,可以在HEALTH_RECORD_TYPES中为每个键定义任意数量的类型。
再次执行,即可生成想要的数据。
到这里,如果你不需要每日更新,只发个朋友圈啥的,就够了。
三. 设置 GitHub Actions 进行数据的增量更新
要实现数据的每日更新,我们需要利用快捷指令和 GitHub Actions。具体的步骤如下:
生成一个AccessToken
我们首先需要生成一个AccessToken,用来作为快捷指令post请求的凭证: 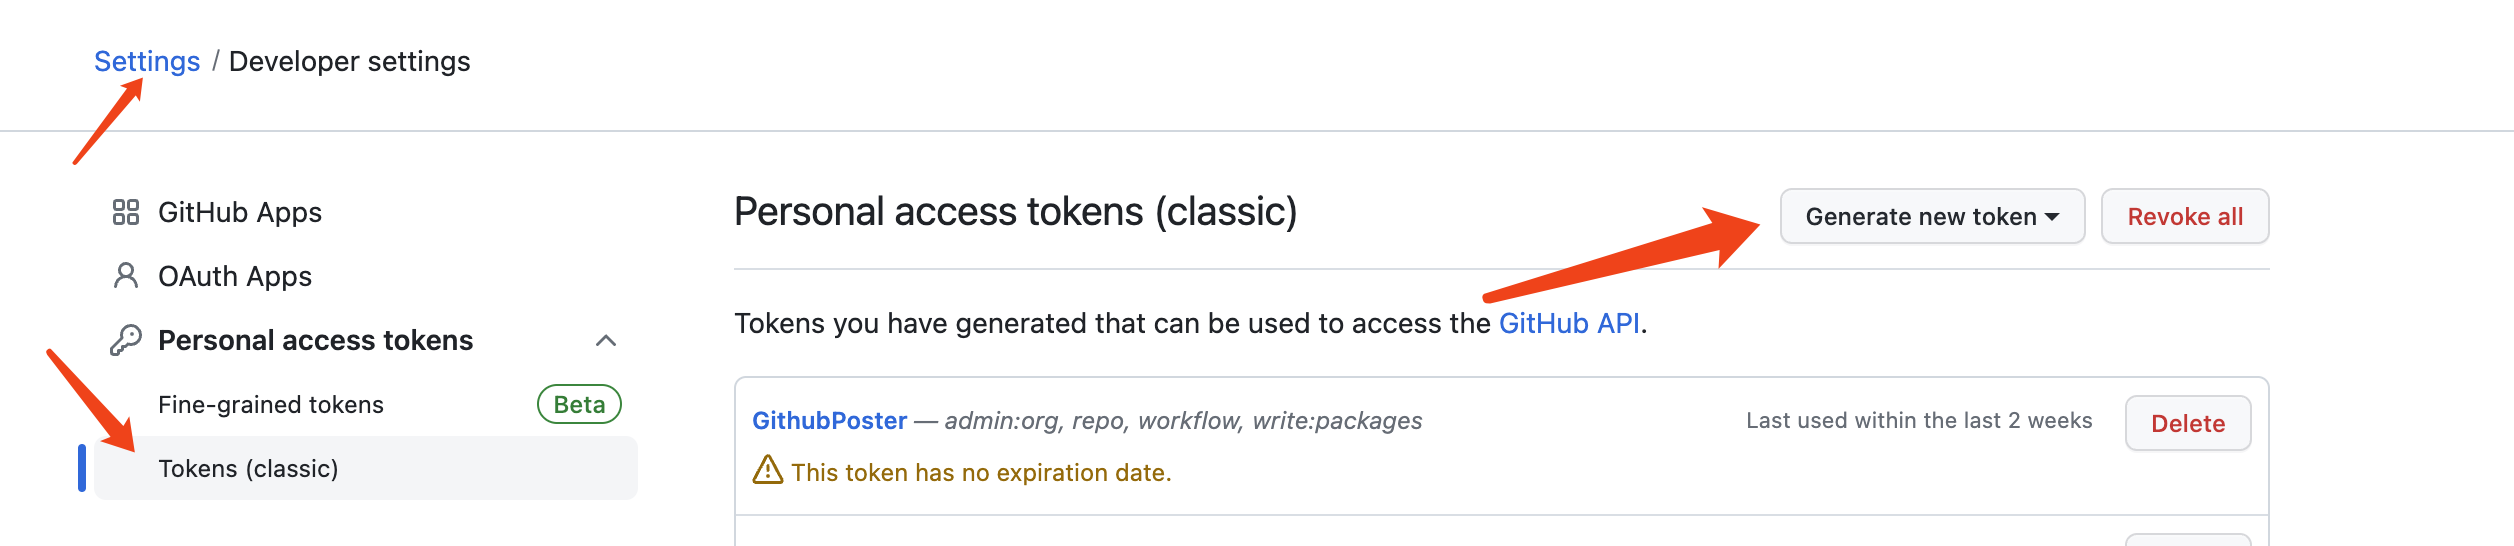
配置GitHub仓库的权限
接下来,我们需要打开GitHub action 的仓库读写权限,用来作为图片生成完成以及数据增量的仓库保存: 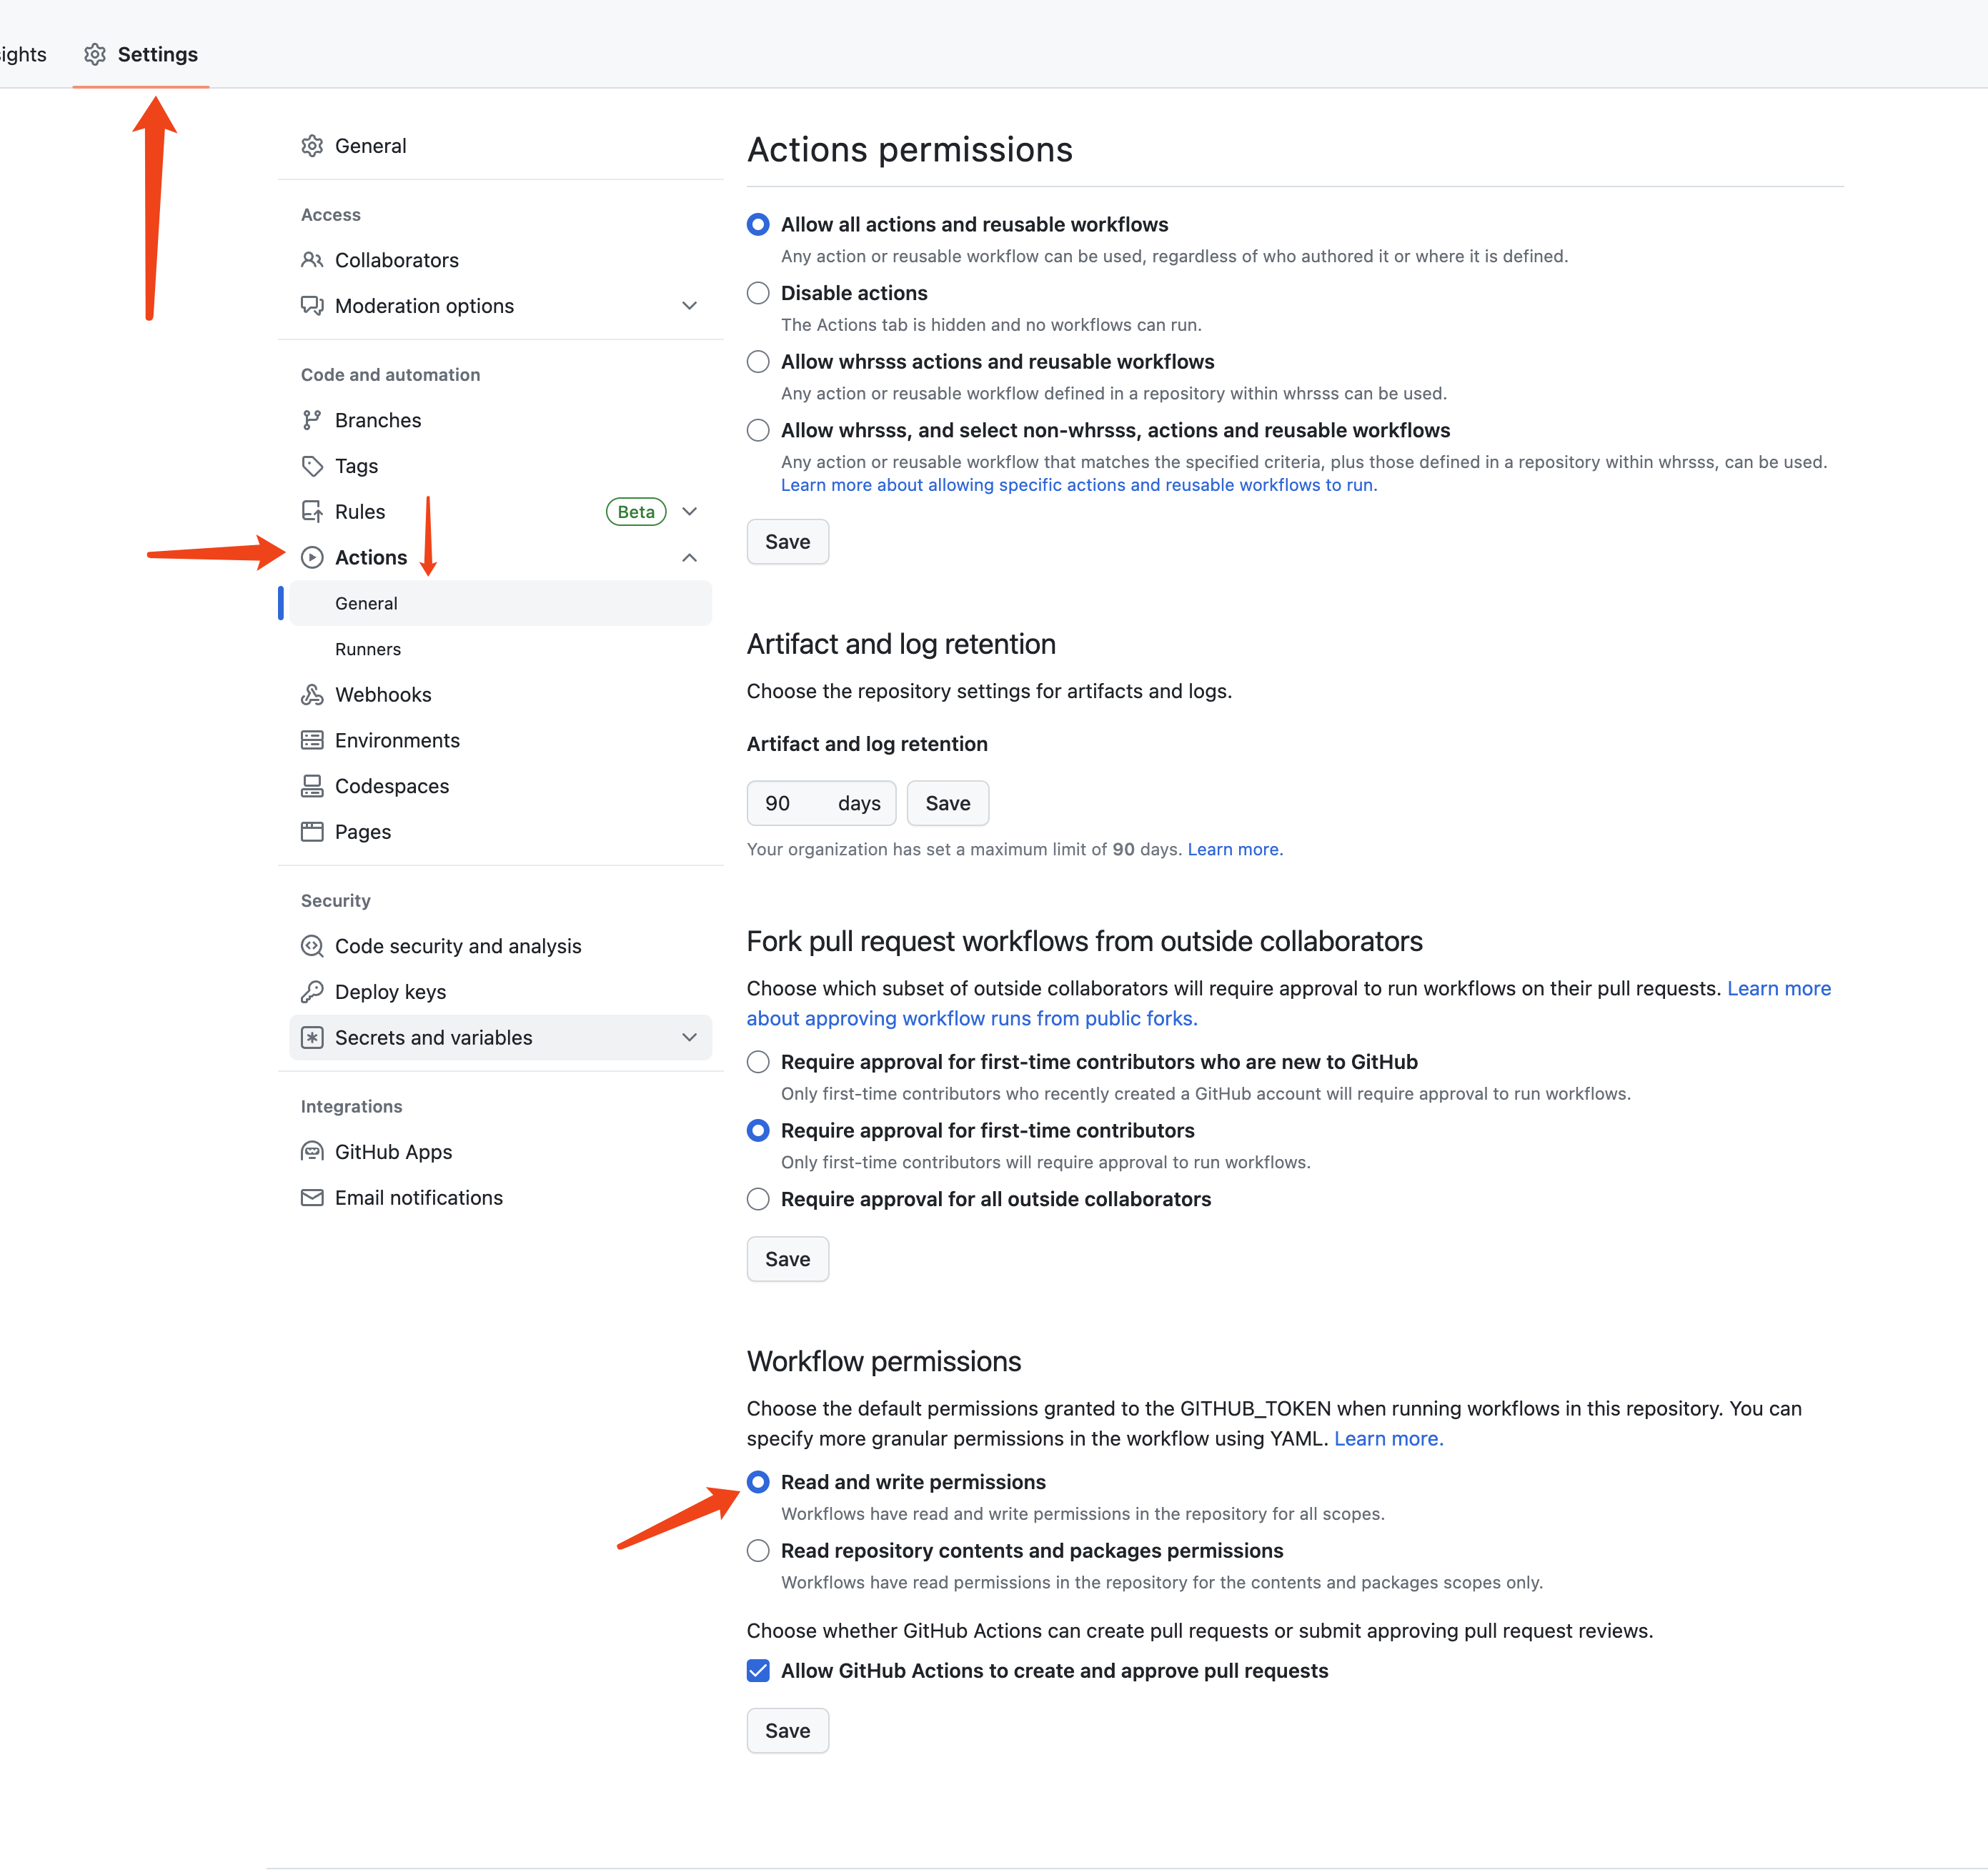
编写 GitHub Actions workflow 编写 GitHub Actions 工作流程
我们在.github/workflow目录下创建一个yml后缀的文件,比如叫sync_exercise.yml,下面是我的文件的内容:
name: Run Poster Generate
on:
  workflow_dispatch:
    inputs:
      time:
        description: 'time list'
        required: false
      value:
        description: 'value list'
        required: false
  pull_request:

env:
  TYPE: "apple_health"
  ME: whrsss
  # change env here
  GITHUB_NAME: whrsss
  GITHUB_EMAIL: [email protected]
jobs:
  sync:
    name: Sync
    runs-on: ubuntu-latest
    steps:
      - name: Checkout
        uses: actions/checkout@v3
      - name: Set up Python
        uses: actions/setup-python@v4
        with:
          python-version: 3.8

      - name: Install dependencies
        run: |
          python -m pip install --upgrade pip
          pip install -r requirements.txt
        if: steps.pip-cache.outputs.cache-hit != 'true'

      - name: Run sync apple_health script
        if: contains(env.TYPE, 'apple_health')
        run: |
          python3 -m github_poster apple_health --apple_health_mode incremental --apple_health_date ${{ github.event.inputs.time }} --apple_health_value ${{ github.event.inputs.value }} --year 2020-2023 --apple_health_record_type move --me "whrsss"

      - name: Push new poster
        run: |
          git config --local user.email "${{ env.GITHUB_EMAIL }}"
          git config --local user.name "${{ env.GITHUB_NAME }}"
          git add .
          git commit -m 'update new poster' || echo "nothing to commit"
          git push || echo "nothing to push"
如果想要了解github action语法的同学可以google一下
上面的yaml的步骤分别是:
1. 定义了一个名为 "Run Poster Generate" 的 Github Actions
2. 指定了两种触发方式,一种是手动触发的 workflow_dispatch,另一种是当有新的 pull_request 时触发
3. 指定了一些环境变量,包括 poster 生成所需的参数
4. 定义了一个名为 "sync" 的 job,指定在 ubuntu-latest 操作系统上运行
5. 包括了三个步骤:
   - checkout:将代码仓库从 Github 上下载到本地
   - set up python:安装 python 3.8 版本
   - install dependencies:安装项目所需的所有依赖包
6. 如果缓存中没有依赖,才会继续执行后续步骤
7. 如果环境变量中的 TYPE 是 apple_health,则执行同步 Apple Health 数据的脚本
8. 完成同步后,将生成的新 poster 推送到 Github 仓库中去。
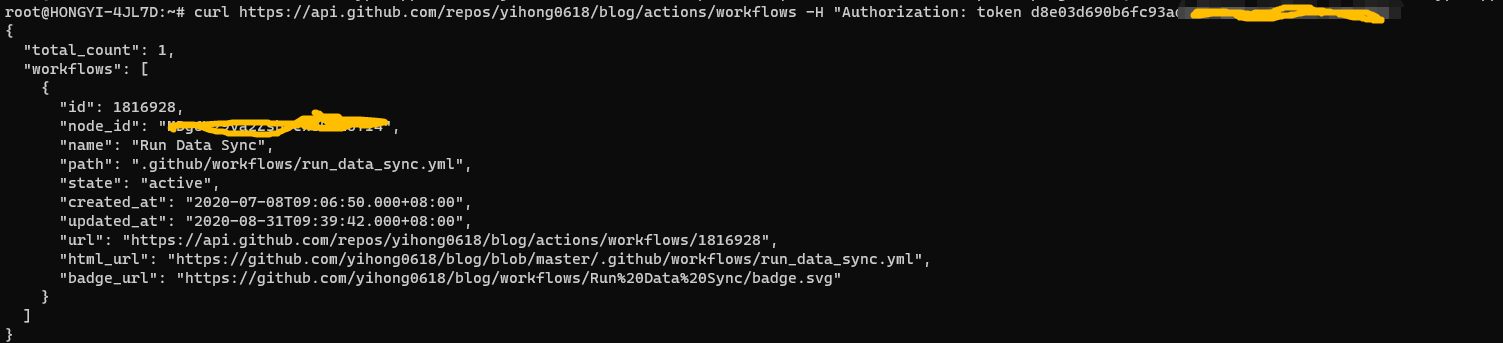
获取workflow id 获取workflow id
我们可以通过以下命令获取workflow id:
curl https://api.github.com/repos/{用户名}/{仓库名}/actions/workflows -H "Authorization: token d8xxxxxxxxxx" # change to your config
上面的token后的token就是第一步获取的token。
创建快捷指令
你可以下载大佬已经创建好的快捷指令,然后修改以下部分即可: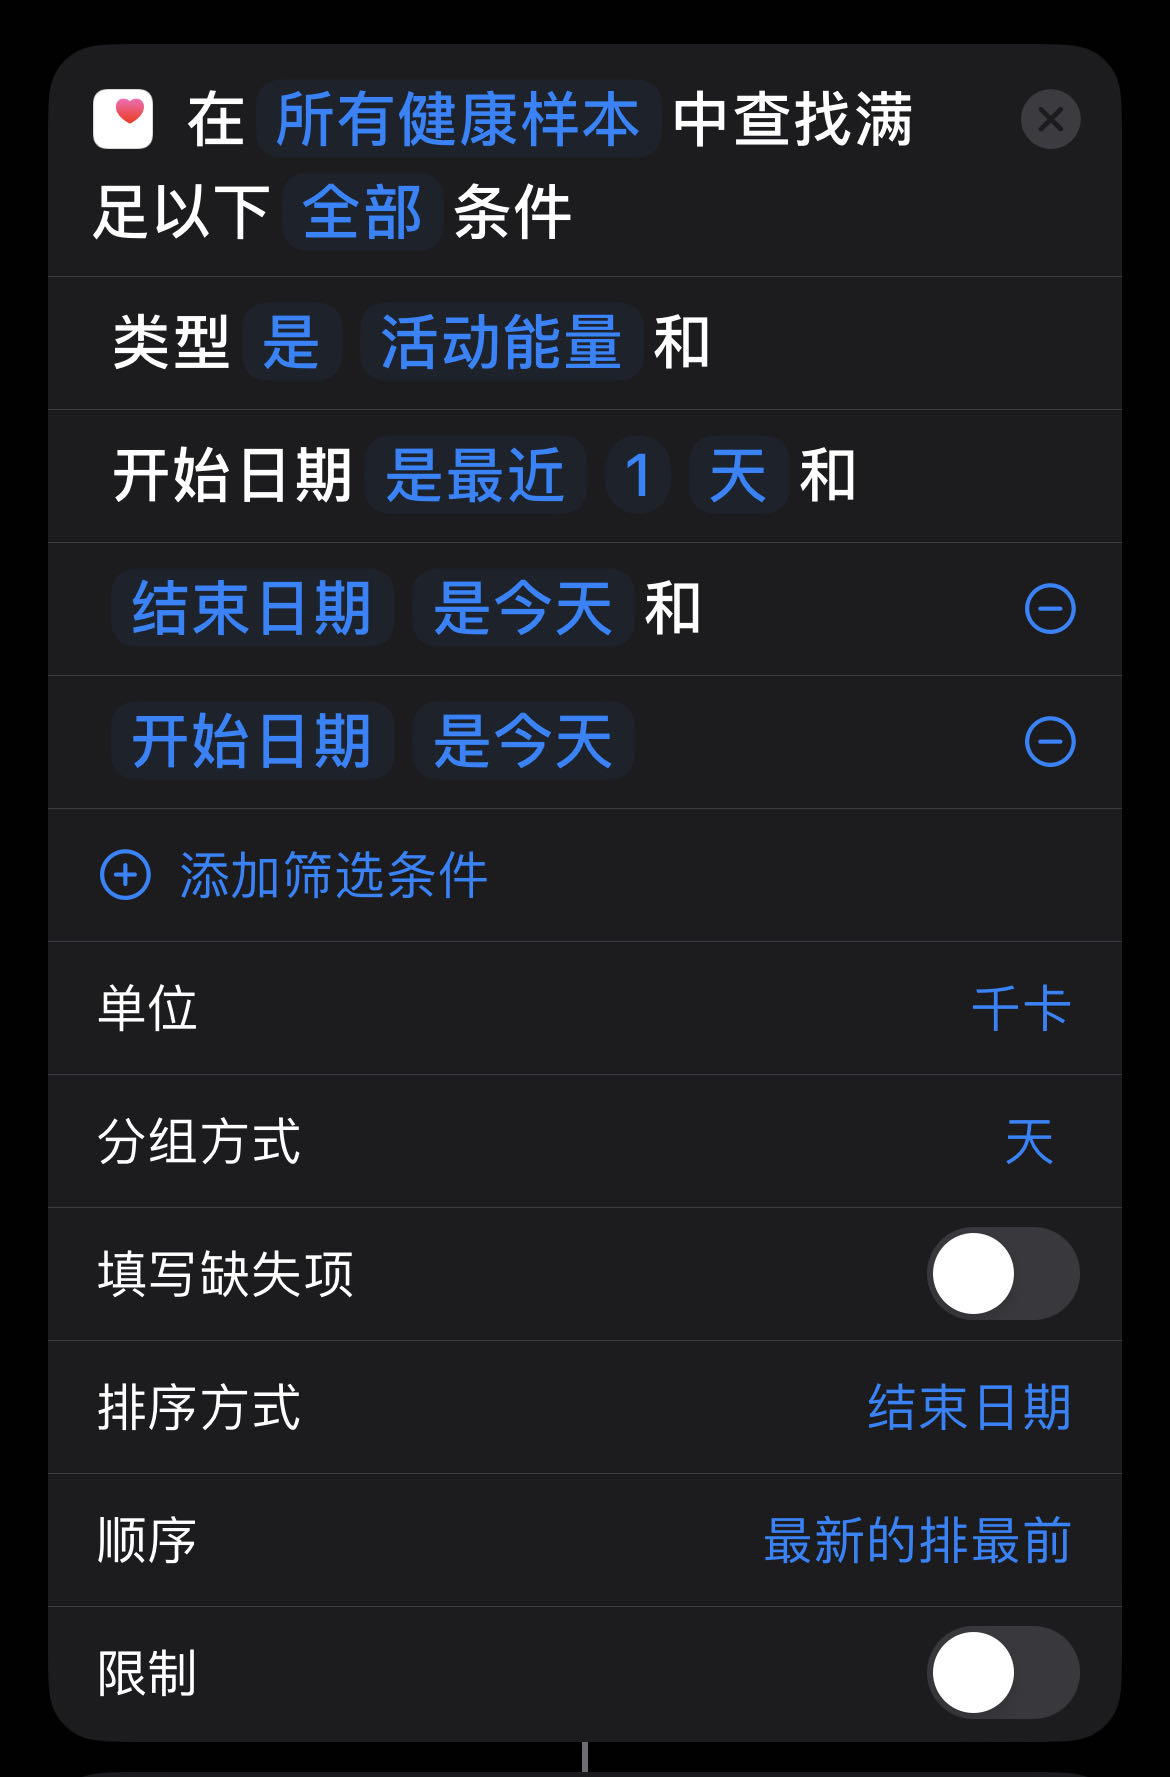
设置自动化
最后,我们需要设置快捷指令的自动触发条件。我选择的是每天结束时进行同步: 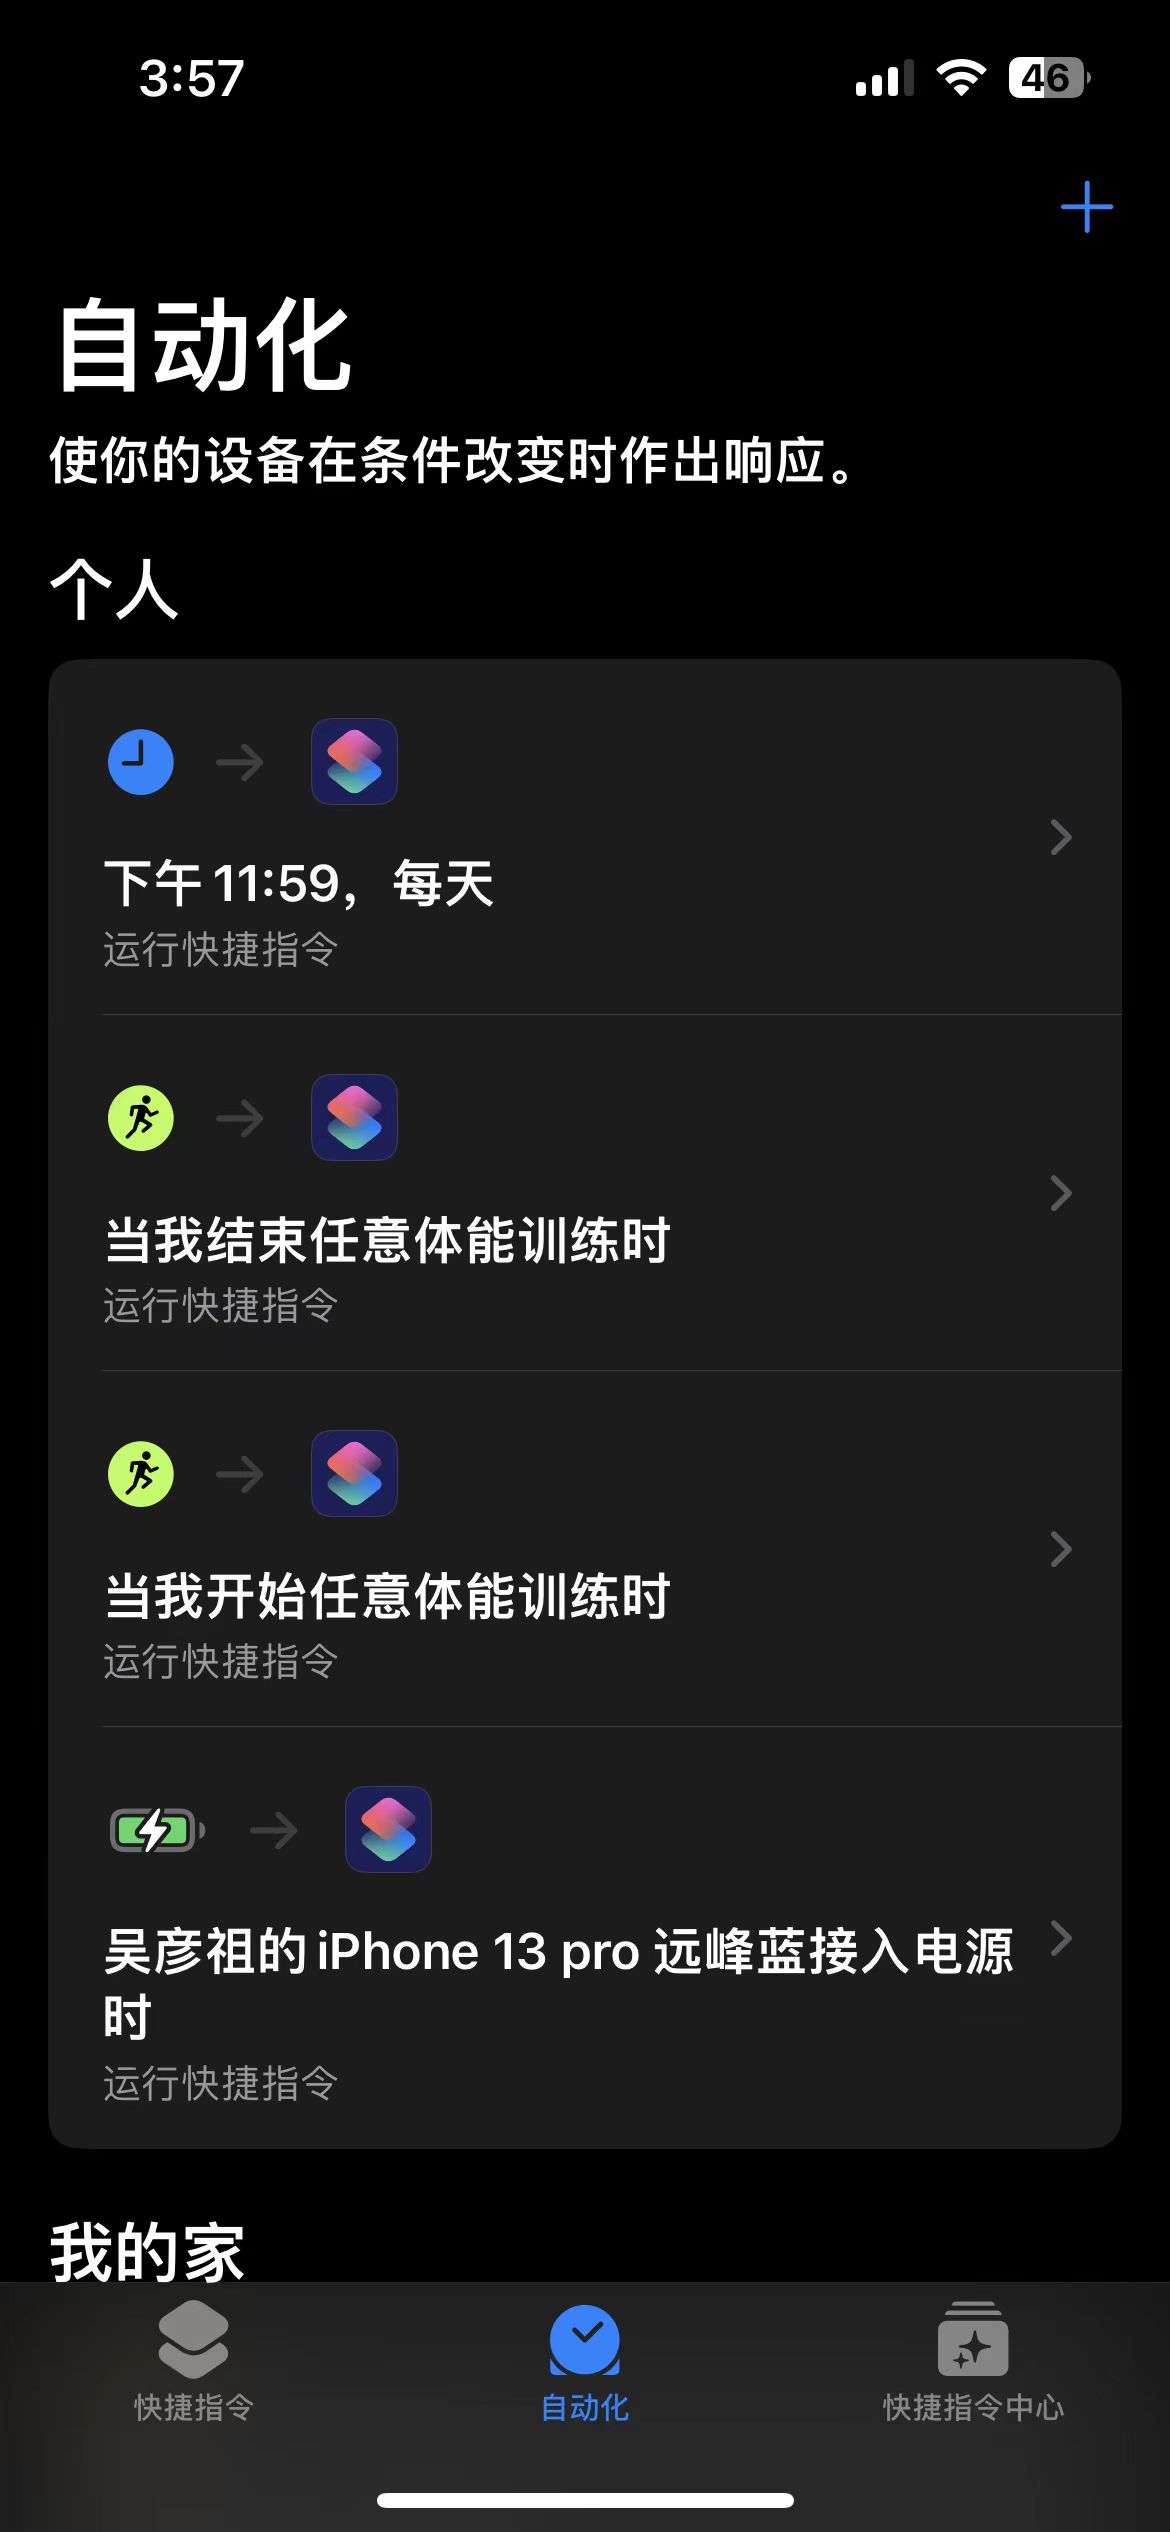
结束语
希望这篇文章对你有所帮助。如果你试过这个项目,我很乐意听到你的反馈和经验。如果你有任何问题或建议,也欢迎在下面的评论中提出。
评论